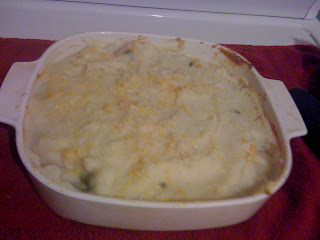
Friday, June 28, 2013

Make a Better Teapot, and Don't Murder Everyone

Hey guys, it's Elyse. I'm going to start this one out by saying that this craft is intended to fill those hours when you are steaming angry, and ready to punch someone.
good god, best gif i have seen in a while
Why? Because it involves painting. Painting anything, doesn't matter what, or how, to me is therapeutic. So this craft is all about taking someone (sorry, SOMETHING) you hate, painting it, then sticking it in the oven to have it come out pretty and new.

When I first moved in with the man that is now my husband, he had an awful teapot that his previous wife (cough, bitch) had left with him. I'm sure after you see this picture, you will understand why. But for this craft, any old ceramic object from the thrift store with a god-awful print will work to soothe your soul. 
Fucking blue leaves...this has disturbed me for 3 years.
The list of things you will need for this craft is small...
1. Any ceramic object you really would love to throw out of your moving car, but are too frugal to do anything like that. 
2. Enamel Paint. This can be found at your local Walmart. (That's right...the store everyone hates to love.)
3. Paint brushes. Don't be stupid. You will not finger paint this. 
4. Oven. If you aren't incarcerated, or in some work camp, you probably have one. 

I chose teal, because I wanted Rachel to be jealous. And I painted the lid red, because there is something almost orgasmically satisfying about bright contrasting colors. 
Step 1.... PAINT!!!! It really is that easy folks, now you will have to do at least 2 coats, because if there is a print at all, or sometimes if there isn't, there will always be brush strokes through that shit. Enamel paint is no perfect substance. 
Ugliness will prevail, even through thick-ass paint. 
Stand your ground, give it some time, and do as many layers as you need. Also, for a smoother look, you will need to make sure there are no clumps, or thick parts, as this paint is like perfect mud-wrestling consistency. (mmmm...sexy)
The red is not so MERICA colored, as it looks in this photo. 


Then, once you are all painted up, stick that shit in a cold oven. Yep, cold. Then, preheat to whatever your bottle of paint says, and leave in for the time instructed. Let them cool in the oven, then you are golden!
This stuff is the best, you can put your painted lovelies in the dishwasher, or hand wash them, use it however you want. IMPORTANT!!!! This paint is not meant for surfaces that touch food or drink, as it may flake or something. IDK, that's what it says on the bottle, but i'm a rebel, because I couldn't leave the inside of the teapot spout unpainted. Hooray for poisoning guests (UN?)intentionally!!!! Now make yourselves a tea wreath from Rachel's post, and you will be two steps shy of being Martha Stewart. (House arrest not included)Hopefully by this point, you have forgotten whoever cut you off in traffic, or spilled your martini. Obviously Martha Stewart didn't paint enough. Although, haven't we all been tempted to be found guilty of insider trading and be on house arrest in our mansion full of crafts? Here it is all done....


Thursday, June 20, 2013

Dirty Mouth Martini

Hey everybody!
It's Rach.
And it's time for the cocktail of the week.
Yep.                                                                                                                                                                                                                                                  

And this week is The Dirty Mouth Martini.
What's salty, dirty and full of vodka?
ME!
Haha just kidding. It's this drink.
So grab you a martini glass and get ready to feel fancy.
You will need:
-A martini  glass
- Some sort of vodka (i suggest a nicer vodka. I like Stoli)
- A jar of olives with juice. ( no pits)
- toothpicks
- ice
-shaker (you could prob find these at any goodwill, if not, just use something with a lid, like a mason jar)
The Avengers. Fighting Sobriety.
Fill your martini glass with ice, and water. and let sit for a minute to get the glass nice and cold.
When a frost forms on the glass, dump it out.
Olive Juice...Olive juice you too!
In a shaker of ice, pour a about a shot of olive juice, to two shots of vodka.
(depending on your vodka, and how much you like olive juice. You may have to experiment ratios to get something you like).
You say potato, I say vodka


Because what's cooler that being cool? ICE COLD!!!


Now shake it like a polaroid picture.
Seriously, shake the crap outta it. The harder you shake, the colder the mixture gets, and little ice crystals end up in it. SO YUM.
Once you are satisfied with your shaking, strain it into your martini glass.
Looks like my vitamins and pepper shaker are getting awfully chummy...
 Garnish with three olives. Three. Why three? Because I fucking said so.
Once garnished. Take it to the face. Like a sir.
Now these drinks are STRONG. So imbibe responsibly.
So enjoy your Dirty Mouth Martini, and pretend like you are in Mad Men.
Too many of these you may start to salute your wall art. :)
<Rach.

Wednesday, June 19, 2013

DOUBLE CRAFT!

Hey it's Rach.
And to make up for the slackness that is me, I'm posting a DOUBLE CRAFT.
That's right. Two crafts for one. Its a long post so I'll shut up and start the crafting.

Because I'm a BAWS.
First Craft:
Home Sick Buddies Tea Mugs.
Elyse lives in Utah, and I live in South Carolina. Hence this long distance blog, we thought this would be a good way to keep in touch, and to share crafts with each other, and the rest of you awesome crafty bitches.
So I came across this awesome mug tute on Pinterest of all places.
Long Distance BFF Mugs
How cute! And since Elyse will be here next month, I am in the process of making her awesome things. I AM SUPER EXCITED.
So I went to Walmart and the Dollar Store.
Hate Walmart, Love the Dollar Store (the everything one dollar store).
But the Dollar Store does not carry Metallic Sharpies.
I digress.
So I went to Walmart and grabbed some Metallic Sharpies. (I used Metallic, because I was using black mugs)
Then I went to the Dollar Store and grabbed two plain mugs for a buck apiece. SWEET.
TWO BUCKS.

So then I got my sharpies together, and printed out an outline of each of our states.
Then I cut out the states right on the outline.
Utah and the "triangle of boredom"
Elyse, who knew your state was so...geometric.
So I positioned each of the cutouts on their own mug, and traced.
Seriously, when I googled "utah outline", I was like, "Bullshit".
Then I went over to the Hot Box, (oven) and preheated it to 350.
I finished the state outlines, and put whatever the fuck else I wanted on it.
Utah

South Carolina

The one with my state goes to her, and the one with her state goes to me.
So every time we enjoy a hot drink, and see the little hearts, (where we live), and go, I MISS THAT CRAZY BITCH.
So I pop 'em in the oven for 45 minutes. After 45 minutes, I turn off the oven, and let them cool in there.
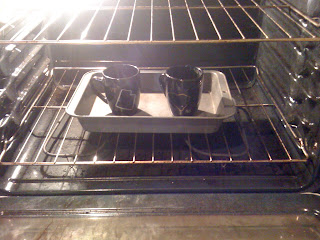
Shine bright like a DIAmond.
And then, when cool, you take em out, and there you go. You can use them AND wash them and the sharpie will not come off ! How cool! And you don't have to just make these, get creative!
They make fantastic gifts!
---------------------------------------------------------------------------------------------------------------------------
Now on to craft number two.
Elyse and I were having a conversation the other day about tea, like you do.
We are both the kind of people who have a plethora of teas in our house at all times. Even me, and I like to think of myself as a java chick. But sometimes you just want a cuppa hot tea. Good for what ails ya and what not.
We both have a TON of tea. Elyse says the husband is constantly asking her what teas they have, while making a mess of the kitchen, and I myself wonder what teas I have, also whilst making a mess of the kitchen.
Not to mention Elyse's parents, who have a better variety of teas then most grocery stores I've ever been in. No lie.
 Then I came across this.
A tea wreath!
A great way to display all the teas you have, without having to constantly rummage through your cabinets, and great for guests! (also gifts)
And its really cheap to make. Like I made two for 6 bucks out of pocket, and had stuff left over.


A tea wreath. An attractive way to display your variety of teas.
But when I think of wreath, I think of an actual wreath, not a circle of cardboard, not that anything is wrong the those. They are very adorable. But I had an idea.
First, get you:
A wreath, or two
 
One dollar apiece. 
Then a glue gun with plenty of glue sticks, obviously. Dog not included.
Bowie in disbelief!
Also, a package of clothes pins. Just regular ole clothespins. Also a buck.
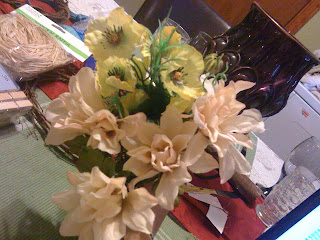
Flowers!
You will need some silk flowers in any color you would like, I got these from the dollar store as well. (This is quickly turning into a dollar store craft).
I don't know what color Elyse's kitchen is so I got peach like her hair, and yellow, because my kitchen is yellow.
Optional is a shit ton of raffia. Feel free to use ribbon. This shit was a mess. Got it from the dollar store...of course.
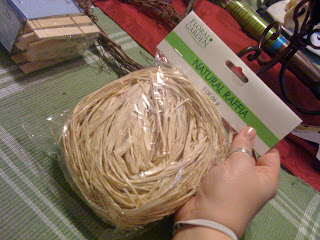
A friggin mess...
 So figure out about how many clothes pins you are going to need, depending on the size of your wreath.
Leave a gap at the top for ribbon and flowers, and ribbon to make some sort of loop to hang it.
Then start to carefully glue on your clothes pins with the part that opens (the mouth) facing out! or else you tea wreath is gonna look hella dumb. Seeing as the wreath is uneven, you might need to hold the clothes pins and use plenty of glue. BE CAREFUL WITH THE GLUE GUN.
Once you have all your clothes pins on FACING OUT! Start adding your embellishments. Get creative!
Just pop em right off the stem, and stick em on. 

Don't be afraid to use the green parts too!!

Add you a bow. Classy.
Glue some sort of loop on the back to be able to hang your wreath. Make sure it's strong enough to hold your wreath with tea on it.
So now lets rummage up some of my tea...
Here....

And here.
and look....
more tea.
Clip them on your wreath, and hang it!
Super cute. For six bucks I had enough to make two of these, if you have a glue gun and packaged tea on hand! They make great gifts, and they are adorable. Get creative! Use your favorite colored flowers and ribbon, and as cheap as they are to make you could make different themed ones for different holidays!
Whew. That was a long post. I'm going to have some wine. This is Creating Under the Influence after all.
Buy Stark Raving Cab here.

Oh and here's the other wreath!


 <Rach.


Thursday, June 13, 2013

No Bullshit DIY Baby Food Confessional

Dear readers,
Elyse here, and I have a confession for you. I am a lazy mom. Yep, there I said it, I am so lazy when it comes to my baby boy, who is almost a year old, and a whole mess of work. If it means that his toys are on the floor in his room after he plays with them, instead of some Better Homes and Gardens bullshit. He is always naked in my house, because he is a mess trap. For about 6 months now, I have been buying jars of baby food, at 60 cents a pop, and feeding them to my poop factory. Bad mom, Elyse, bad mom. I recently ran out of jars of carrots, GASP! and they are his favorite. Nothing in this world pleases my son like carrots. He lights up like it's Christmas, (actually, more than Christmas, because the made up holiday has no affect on him yet.) So, Ladies and gents, grab your own poop factory, plop them down in a highchair, and get to crackin on your own DIY baby food. (I promise this is easier than the tutorials that involve ice trays, portioning, and all sorts of bullshit that people without nannies don't have time for.

Here is Liam, who I sometimes  call Little Chef, and he is busy judging me and eating Cheerios.

So, to do this, you will need a food. I know, I know, it sounds ridiculously stupid. But when you are standing in your produce section, wondering wtf you should turn into baby food, you will thank me for suggesting these:

-Carrots
-Split peas
-Apples
-Berries
-basically, anything your child is willing to eat, that you can boil and blend.

I chose carrots for this, because as I said earlier, my child would eat carrots until he turned orange, and then would keep eating them. Because babies don't care if they're orange. 
I peeled them first, because the skin makes carrots taste weird, and Little Snob would not approve. 

Chop your food into boil-able sized chunks. This will vary with each thing, so put on your thinking cap, and then take it right back off, because this project doesn't even require that. 

Yep, not rocket surgery.
Now, boil the ever-living shit out of them! Boil until whatever you are preparing are soft as a baby's butt, which is really way too vile to even go near. 

Drain with a colander, and add to your blender, with how ever much water it takes to reach your desired consistency. Add slowly as you blend, so you don't overdo the water. 


Now, take that lovely mush, and divide it into empty baby food jars, and tell Gerber to go suck it! It takes me about 20 mins, including the boiling to do this, and it is worth the minimal effort. Stand proud, lazy Moms everywhere, because when you tell people that you make your own baby food, they will marvel at how damn earth-conscious, and handy you are!

Stick that shit in the freezer, and bring down a couple every couple of days to the fridge to thaw. Or, if you don't think that far ahead (I never do,) you can stick them in the microwave without the lid, and thaw them. Voila! So, the message here is, lazy moms, you still make a difference, raise lovely children, and can still wipe the floor with Betty Crocker's ass.

Wednesday, June 12, 2013

"Fisherma'am's Pie"

Hola! Rach here,
And today is all about a delicious easy dish called "Fisherman's Pie".
But I'm calling it "Fisherma'am's Pie" because girl power. Yep.
So many of you chicks might be a bit intimidated about cooking a dish with fish. (lol)
Or anything that involves you oven for that matter. (I've been there!)
But fuck that shit, and grab a casserole dish 'cause you are about to endeavor into something awesome!

I live around a little pub called "Madra Rua's". It's an Irish pub and everything they make there is SUPER GOOD. Usually I get the Shepard's Pie, but this last time boyfriend decided to try the "Fisherman's Pie". And boy was it delicious!

Served in a cute little ramekin, it was cod, shrimp, and veggie, topped with mashed potatoes.
Ermergerd. Per.

So, last night I was wandering around my kitchen, wondering what I was going to make for dinner, and I realized that I had pretty much everything I needed to make a quick and tasty version of this dish. Quick being the word, boyfriend claimed his stomach was eating itself, so into cooking action I go.

For this recipe you will need:
-Some sort of fish (I used Tilapia,because that's what I had, but feel free to use anything you like, including shrimps and scallops)
- A casserole dish, or single ramekins (you fancy, huh?)
- Veggies of your choice (canned was good enough for me!)
- Milk
-CHEESE
- Mashed potatoes (make 'em from scratch, instant, buy them made, don't matter)

Pre-heat oven at 350

Preheat your oven, at 350 degrees, and get out a casserole pan, and the rest of your ingredients.
Fishy...


 I am using tilapia, because that's what I have, and usually had, in my freezer. Its a white fish that pretty much tastes like whatever you season it like.Plus, it's pretty cheap.

Next add just a little milk over the fish. This takes the fishy taste from the fish, and helps the ingredients form a sort of gravy or base for the dish.
Next, add butter or margarine, either is fine, and some seasonings. Salt, pepper, whatever you have around, I added dill because I happened to have some, and if you cook a lot of fish, it's really good to have around.
I also chopped the fish up a bit, to make bite sized pieces. (I know it's not looking to delicious right now).
No salt added....until later...


So add in your canned veggies, or frozen or fresh. The key to this recipe (and blog) is using whatever you have around. I used corn and peas, but feel free to use carrots, asparagus, anything!

So in they go!!!
Casseroles are like ogres. They have layers.


Then, I added a layer of cheese BECAUSE CHEESE THAT'S WHY.
Then you make your mashed potatoes, by following the directions on the package, if you are a lazy bitch like me, or you can make them from scratch because you're fucking crazy.
Lazy. Potatoes.

I added some garlic, because $.50 packages of mashed potatoes are not usually top notch in the flavor department.

Throw 'em on your fish dish. More layers. This shit is complex.
Mashed potatoes are meat frosting. Think about it.

Then throw that shit in the oven for like thirty minutes, or until you are pretty sure it's done. Whatever.
Lookin' all majestic n shit.


Bowie says he's hungry! Make it come out the hot box!


Thirty minutes later...

Perky ears are a good indication your food is done. 


Take it out...
Sprinkle some cheese on that shit.
And serve.

It it pretty? No.
But is it fucking delicious? Hell's Yeah.
Chances are it won't be around long enough for anyone to notice it's not super fancy, but it's the kind of dish that's not really supposed to be. It's just good eatin'.
Impress your friends with a fish dish that's sure to please, and not empty your wallet.
Get out there and try something different!
It's always ok to create under the influence.
<3 Rach.

SIDE NOTE: I know my pics are kinda crappy. It's my P.O.S. phone. Getting new batteries for my nice camera soon, to remedy this. Thanks for understanding. :)