Monday, May 27, 2013

The Bright n' Early- (Memorial Day Drink recipe)

Hey guys,
In honor of Memorial Day weekend, I have decided to post my recipe for my version of an alcoholic Arnold Palmer, which I call the Bright n' Early, because we all know that golfers have a knack for making 10 am drinking classy. Something about the birds still chirping, and the sun barely above the horizon makes you want to hit some balls, and get schmammered. So this weekend, while you are out barbecuing and gathering with family, make yourself and your family (children not included, of course) some of these. It will impress them, I promise. Here we go.......
1. Gather the necessaries.
         You will need:
-VODKA!!! The king of all that is drinkable and lovely. (I used Skyy, but you can use any vodka you have on hand, this drink recipe will pretty much cover up the taste of the cheaper stuff. OR you can run some Stoli through a brita pitcher and BAM! It is wayyy improved. )
-Lemonade! I bought the stuff that is a dollar per half gallon. beat that!!
-Sweet Tea! Now, being from the south, i usually make mine, but I had run out of tea bags, so i had to buy this processed crap for this go.
-Optional, Lemons and Strawberries. Okay, totally not optional if you are going for the WOW factor, muy impressive. It makes people think, "I wish I was thoughtful enough to put fruit in my drinks"


Golfers, ASSEMBLE!!!!!


Now add some ice to your tall glasses, and pour in 2 shots of vodka. Or 4, or 10. 
yes, that shot glass IS real crystal. and from the thrift shop.
Next, add the rest! I put my lemonade in first, because, like Rachel described in her Tequila Sunrise post, the lemonade is more dense, making the tea sit a little bit on top of it. Your family will be in awe, and you will revel in the domestic goddess glory. 
The only way to get smashed on this lovely holiday.


Now you will want to make sure that you have a lot, and I mean A LOT of tea and lemonade, because these are going to be a hit. AND they are so simple to make, you can describe the process to your significant other from your lawn chair, and have them make the rest. I tip my hat to you golfers, for bringing about early morning drinking, and inspiring this lovely yard drink. 
FORE!


Monday, May 20, 2013

Sushi Mat Make-up Brush Organizer.

Hey! Rach here!
Yep. 
Your read that correctly.
Sushi Mat Make-up Brush Organizer.
It's super easy, and you only need a few things, of which I had lying around the house.

I thought I'd make this tutorial because it's summer time, and that means lots of graduation parties, and you are gonna want to make gifts for all you sorority friends! Or, just make one for yourself, to pack in your suitcase when you party it up in Cabo.
                                        Whatevez.
You will need:
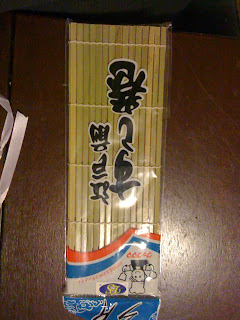
A Sushi Mat!
And they are super cheap.
That's correct. $1.29 (American)
You can get these at any Asian Market, in different sizes. I opted for the larger one.
(Actually, its what I had left over, and still in the package when the boyfriend and I decided it was a good idea to make our own sushi. Turns out it's just a huge pain in the ass. :/)

Next, you will need elastic, the kind you make clothes n' stuff with. You can get this stuff at Walmart, any fabric store, or a craft store, like Micheal's, A.C. Moore, or Hobby Lobby.
You could also use ribbon, but it won't keep your brushes as secure as elastic.

Finally, you will need a piece of ribbon of your choice to finish off and tie up your new brush organizer.

I had this. :0

  Sweet. Disregard the matches. I have no idea why they are on my table at this point.

Then, lay out your sushi mat flat on your surface, and decide which side you want up. Mine had a shiny green tinted side, and a rounded "unfinished wood" looking side, which you can see in the pic below. I chose the latter to be the inside.

Then, with your mat flat, roughly measure a piece of elastic an inch or two longer than your mat. This leaves room for mistakes, and room for the brushes to fit.
Then, just start weaving.
It's elementary. Seriously, you literally did stuff like this in elementary school.


Alternate weaving, and use two sticks as a space for smaller brushes, and three or four for a larger brush. And in between loops for brushes I leave about two spaces.

 Once you have finished weaving all the way across your mat, just take the extra bits on the end, wrap 'em through again, and cut the excess.
Like so. (Hopefully, wherever you are reading this from you are allowed access to scissors.)

You should have something like this now, after you stick some brushes in there. :)

                                              Fancy.


Now, you roll up the mat with the brushes inside.
And tie off with your ribbon.

                                                   DANG. Skillz.

You can weave your ribbon if you like, but I chose to just wrap it around the mat a few times, the tie the bow, since my ribbon was not very thick. Also, feel free to change out your ribbon, to match your make up bag, or purse, or make it the person you're giving it to's favorite color.

                  Staged with some girly shit to get the full effect. :)

This was a pretty cheap craft. And you can always stop by the Dollar Store, and get some decent brushes, and nail files to slip in the organizer, or put it all in a goodie bag for your friends along with some nail polish, candies, etc.

Happy Crafting, and remember, it's always ok to Create Under the Influence!
<3 Rach
SIDE NOTE: We have seen we have viewers from all over the world (incredible) and seeing as this is a new blog, we would LOVE  to hear back from our fans! Let us know what you think, and what you would like to see from us! :) Comment Below!






Thursday, May 16, 2013

Easy Peasy Dinner - Pork Loin.

Hola Bitches!
It's Rach here, and in lieu of end of the school year, college chicks and moms alike want a super easy dinner.
And wine. They want wine.
So Imma show you how to cook a pork loin.
That's right pork.
                                     Aww...he looks DELICIOUS. 

Pork can be daunting, considering if you don't cook it correctly, you could become seriously ill.
But no worries craftonistas! We are gonna cook the ever loving crap outta this cute little guy. :)
First, you need a crockpot, and if you don't have one, spend the 20 bucks and GET YOU ONE. SERIOUSLY.
It doesn't need a digital face, just the turney nob will do ya. (those are cheaper).
And. you will need about four hours. (While this is cooking, you will have ample time to dye your hair an awesome color, a la Elyse's blog entry Pastel Hair, the CUI way)

First,  get yourself a pork loin. At any supermarket, and you can get them already flavored.
I like this brand, and they come in a ton of flavors, and plain if you wish.

Then, get your crock pot out.
                                      Thanks Grandma!

I should mention at this point the pork loin should be thawed.

Then throw it in the crock pot.
Then cover with garlic...mmmmmm. Garlic.

Ok, for some reason this picture looks fuuuuuucked up. But it's minced garlic, and a jar of "Carolina Treet" a brand of South Carolina barbecue sauce.You can use any brand of yellow sauce for this recipe, but this is the one I had on hand.  Its yellow, and mustard based, and originated here in South Carolina, when we say barbecue here, this is what we mean. And it's AMAZING.

But, you can use that brown goop excuse for barbecue if you like.

Dump some of garlic over the pork loin, and then pour a good bit of the sauce over it as well. (but save a bit for the end).


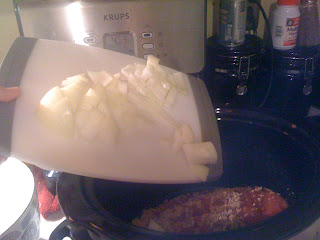
Then get you an onion, full of onion-y goodness. If you don't like onion, then don't use it. (WTF is wrong with you..?)

Throw it, (chopped up) in the pot.
Then, put the lid on it, and cover it up. For about four hours. Seriously, just leave it the F*ck alone.

Then, after four hours, for an average sized pork loin, it's DONE. And to think, all you did was dump shit in a pot. :)

When it's done, it should just fall apart. (Just like you do after watching The Notebook, and having too much Chardonnay).

Then, serve it up on a plate. Preferably with an equally awesome side dish, like a loaded baked potato.

Then, take the rest of the sauce you saved, and pour it on top of the pork loin. :) AND DIG IN!!!!
You're Welcome. Don't be so afraid of pork!
Goes great with wine. Any wine.
<3 Rach


Monday, May 13, 2013

Pastel hair, the CUI way

WORK WORK WORK!!!! I have been so damn busy working, and when I finally got a second to catch my breath, I realized that the awesome peach pastel hair that sat atop my head had faded, and it was bad, let me tell you. So i ran to my local beauty supply store, and purchased my supplies to set my doo right. In this tutorial, I am going to give you a loose guide that should give you what you need to achieve that pretty pastel color that has been a bit of a craze lately. Here goes nothin!
WARNING!!!! We all know that I am not a stylist, and am not licensed, so please don't write me saying "Elyse, Elyse, I burned all of my hair off!!! Pay for my hair plugs!!" I will tell you to refer to this, and to shut the hell up.

1. BLEACHING!
If you already have that gorgeous snow white hair, you are ready to go, and can skip this. However, most of us don't have our hair primed for what we need to do next. I use L'oreal Quick Blue powder bleach, and 30 volume developer. You can find these at stores like Sally's. Now, it is best to have your hair a little greasy before you bleach, this will protect your scalp from the awful burn that can come from putting noxious chemicals on your head, duh. 
(here is an example of my poor, neglected locks, as greasy as a corn dog at the fair)

Apply bleach with a applicator-brush-thingy, trying your best to keep off of your roots. (You will seriously fry your skin) I take small parts of my hair, and apply to both sides.
(yep, my bathroom doesn't look like Better Homes and Gardens material, but you should already know this is not that kind of blog)
In this tutorial, I only bleached my roots, because that is all I needed. Oh, and please put on some music while you do this to distract from your aching arms. Once they have been in the air that long, you will wish you had called a friend to help.
Make yourself a cranberry and vodka, and settle in, mine processes at different times every time I bleach it. I just rinse when I have checked the very last piece that I applied bleach to, and it is as light as I would like. 
Here is what I do while I wait, feel free to also style a bleach-hawk and take selfies. 

( A girl has to find time to catch up on some Batman game news)
Now, rinse that shit out, and marvel at the fact that you look like the White Queen from Narnia. 
(shock, awe!!! )
If you are impatient, you should now dry your hair with a blowdryer, or if you are like me, you will wrap your head up like every woman inherently knows how to do. 
ew
Now that your hair is completely dry, let's get to part two...DYEING!!!

Dyeing, that word always looks like it is spelled wrong. 
So, if you are looking to get a different color than peach, then you will have to figure out your own color mixture. I used to use Manic Panic to get my eastery locks, but now I am using a different brand, to see if it is any more permanent. Here are the products that I mixed. But first, the SECRET INGREDIENT!!!
To take the full color dye to the more light tones that you are trying to achieve, you mix it with whatever white colored conditioner you have on hand. 
What did that bitch just say?????
Yep, take that V05 that you have lying around for emergencies, because this is the emergency you've been waiting for!!! Dump a good bit into a mixing bowl, and begin to add your color. Remember, it will take a lot more conditioner to cover your hair than you think it will, because you will soak it up like a thirsty sponge. 
Unless you have countertops that you don't mind staining, then remember to place something underneath your bowl, unlike I did. 
Now, begin to add your color, I add some, then mix, then add more. I put in pink and orange to make my color a little more peach, a little less cotton candy. You will want your mixture about 2 shades darker than you want your hair to turn out, when you wash it out, you will thank me. 
Here is my mixture. Now, rub that shit ALL over your head, I just use my hands for this, because I am no pussy!
BEWARE!!! absurd picture ahead!!!:
This is how it looks before I wash out the conditioner dye mix. I know, I know, I look ridiculous, and I am okay with that. I will redeem myself, I promise. 
I let mine sit on my head for as long as my schedule allows, but no less than 2 hours. WAIT, 2 HOURS, you say? yep. Because it is diluted, I leave it on as long as I can. You can always rinse off a small piece, and see if it is where you want it to be. 
Next, RINSE MY PRETTIES, RINSE!!!!!
Dry, style, whatever makes you feel better. Now you know, and with knowledge is power. 
Oh, here is mine all done!!


Wednesday, May 8, 2013

Prosciutto wrapped Sirloin Steak!!!

Ladies and Gentlemen,
       My new love is meat. ( giggle if you must) Seriously, in my time cooking, I've always thought of meat as something to be put onto heat and served. My poor husband ate a lot of crockpot meals, and pretended to like it. Lately, I have been eating Paleo-ish ( dietary guidelines aren't for broke bitches like me) This new food guideline has opened my eyes to new ways to enjoy the thing that now adornes every plate at every meal, COOKED FLESH!!!! Also, I will share a secret with you...I refuse to grill anything. We have a charcoal grill at the house, and I refuse to step near it. It intimidates me. Thus, I am bringing you a pan-seared (gasp!!!) steak recipe that will bring tears to your eyes and make you worship cows like a Hindu.
Because I have an infant (read lazy) I needed a quick, easy protein recipe and here it is....You're welcome in advance.

You will need:

mustard ( use the good stuff, ballpark yellow mustard won't do the trick here)
1/2 lb prosciutto
4 palm sized sirloins
small amount of coconut oil
your fave seasonings

WAIT!!!! A fancy Italian ham, what about me and my blue collar??? Yes, it seems fancy, but FEAR NOT!!!! you can find this at any deli counter.

Lets get to it!
1. Slather steak in mustard, don't drown that shit, just enough to cover the outside.
2. Wrap steak with prosciutto and secure with toothpicks.
3. Sear in heated coconut oil in a large saucepan on medium heat. Cook to your desired done-ness. Season as you go in the pan with your desired seasonings. ( I was too lazy to reach into my spice cabinet, so I used salt, pepper, and garlic and onion pwder, because they were already on my counter. )
4. Done...
.......Yep. Read it again. Done.

Let it sit for a few minutes before digging in, and top with Parmesan or feta cheese, and then revel in the glory of the domestic goddess compliments. Also,enjoy the tequila sunrise recipe that Rach shared, or a beer as I did, because cooking, like crafting, is always more fun under the influence.


Sunday, May 5, 2013

Cinco de Mayo!!!

Hey everyone!!
Happy Cinco de Mayo, or as Elyse likes to call it, "Cinco de Drinko".
Making a cocktail today that brings the sunshine in.
Because it's been raining cats and dogs here for a friggin week.
                                                    Blugh. 
So in honor of Cinco de Mayo, I'm making the classic Tequila Sunrise.
In order to make this drink you will need the following:
-Jar of Cherries
-Orange Juice
-Your brand choice of tequila, (We enjoy Patron Silver here at CUI)
- If you are a punk, and can't handle tequila, you can use your choice of vodka. Plus, you're a pussy.
 yep, thats a tiki shot glass. you can get them at my favorite place, the dollar store. :)

Make sure your glass is clear to get the desired effect.

Then, pour your liquor in the glass.

                                                                  Yum.

Then, add your OJ. Leave some room at the top for cherry syrup.
Oj. Even though you should probably drink apple juice, because OJ might kill you. Then slowly drive a white bronco down the interstate. 

And now, if you are still reading despite my terrible, tasteless jokes, SLOWLY pour cherry syrup into the glass. The syrup is heavier than the orange juice, so it will sink to the bottom.
You know, density n' shit.
                                           Science AND booze. This bitch can't be for real!
As you can see, it's created this lovely effect, that looks like a ...SUNRISE. Whaaaaaat?

Garnish with a cherry and an orange.
                      Let the sunshine in!!! Second best thing for seasonal depression.
So, until it stops freekin raining and raining and raining, I will have to make my own sunshine.
(Like my little sun? Dollar Store. That place is straight amazing.)
This pretty little drink will be a welcome addition to any Cinco de Mayo party, and a nice change from the margaritas, and Coronas. Although I won't judge if you still feel like taking your tequila straight to the face, with a bit of salt and and bite of lime. Like a BAWS.
Make a few of these to go with the mouth watering ribs recipe that Elyse will be posting next!
And remember, it's always ok to Create Under the Influence. :)
<3 Rach


Saturday, May 4, 2013

Buying rugs is for pussies!

Hey guys and dolls,
    Elyse here with a crochet pattern for a simple floor rug. I received a whole bunch of recycled twine (how earth conscious, and blah blah blah...) and needed something to do with it. So, if you crochet, here is my pattern. This pattern is not posted with any hook size, as you will have to determine what hook is appropriate for your material.

-In magic circle, ch2 and dc 6, join to ch2
- ch2, dc2 in each dc, join
-ch2, dc in same st, *dc in next, 2dc, *, repeat ** around
- ch2, dc in same st, *dc in next 2, 2dc,* join
-ch2, dc in same st, * dc in next 3, 2dc,* join
-ch2, dc in same st, * dc in next 3, 2dc*, join

I am extremely lazy and waiting for ice to freeze for my next post, the Dirty Girl Martini, so hopefully you see a pattern emerging here. Increase rounds until you reach your desired size, then lay it down on the ground, and make damn sure everyone who visits your house knows you made that with your crafty little hands.
                                                      ( ooooh, pretty)
                                                           (Instagram as fuck)
                                       ( yep, you could even rest your shoes dramatically on it)

as always, enjoy responsibly