Hey! Rach here!
Yep.
Your read that correctly.
Sushi Mat Make-up Brush Organizer.
It's super easy, and you only need a few things, of which I had lying around the house.
I thought I'd make this tutorial because it's summer time, and that means lots of graduation parties, and you are gonna want to make gifts for all you sorority friends! Or, just make one for yourself, to pack in your suitcase when you party it up in Cabo.
Whatevez.
You will need:
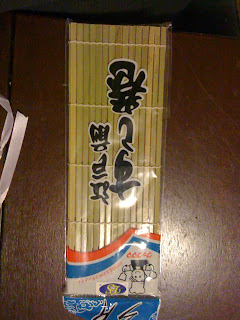
A Sushi Mat!
And they are super cheap.
That's correct. $1.29 (American)
You can get these at any Asian Market, in different sizes. I opted for the larger one.
(Actually, its what I had left over, and still in the package when the boyfriend and I decided it was a good idea to make our own sushi. Turns out it's just a huge pain in the ass. :/)
Next, you will need elastic, the kind you make clothes n' stuff with. You can get this stuff at Walmart, any fabric store, or a craft store, like Micheal's, A.C. Moore, or Hobby Lobby.
You could also use ribbon, but it won't keep your brushes as secure as elastic.
Finally, you will need a piece of ribbon of your choice to finish off and tie up your new brush organizer.
I had this. :0
Sweet. Disregard the matches. I have no idea why they are on my table at this point.
Then, lay out your sushi mat flat on your surface, and decide which side you want up. Mine had a shiny green tinted side, and a rounded "unfinished wood" looking side, which you can see in the pic below. I chose the latter to be the inside.
Then, with your mat flat, roughly measure a piece of elastic an inch or two longer than your mat. This leaves room for mistakes, and room for the brushes to fit.
Then, just start weaving.
It's elementary. Seriously, you literally did stuff like this in elementary school.
Alternate weaving, and use two sticks as a space for smaller brushes, and three or four for a larger brush. And in between loops for brushes I leave about two spaces.
Once you have finished weaving all the way across your mat, just take the extra bits on the end, wrap 'em through again, and cut the excess.
Like so. (Hopefully, wherever you are reading this from you are allowed access to scissors.)
You should have something like this now, after you stick some brushes in there. :)
Fancy.
Now, you roll up the mat with the brushes inside.
And tie off with your ribbon.
DANG. Skillz.
You can weave your ribbon if you like, but I chose to just wrap it around the mat a few times, the tie the bow, since my ribbon was not very thick. Also, feel free to change out your ribbon, to match your make up bag, or purse, or make it the person you're giving it to's favorite color.
Staged with some girly shit to get the full effect. :)
This was a pretty cheap craft. And you can always stop by the Dollar Store, and get some decent brushes, and nail files to slip in the organizer, or put it all in a goodie bag for your friends along with some nail polish, candies, etc.
Happy Crafting, and remember, it's always ok to Create Under the Influence!
<3 Rach
SIDE NOTE: We have seen we have viewers from all over the world (incredible) and seeing as this is a new blog, we would LOVE to hear back from our fans! Let us know what you think, and what you would like to see from us! :) Comment Below!


